Saturday, December 31, 2011

Eggless Chocolate Walnut cake


With life being extremely hectic, with work, two weddings coming up in the immediate family, house repainting, cleaning, shopping etc, blogging has taken a back stage… I am however, cooking and baking quite regularly, but at odd hours or always multi-tasking with something else that taking pictures and blogging is taking the blow. There are however quite a few dishes still in the memory card, waiting to be downloaded! May be I’ll get them all to light in the new year!!
Till then, here is one cake that I baked for D’s birthday this time. With all the mentioned crazy schedule we had, I could not make any fancy cake with decoration. But this was one easy, quick and tasty cake. I tweaked m eggless sponge cake to make it chocolaty and topped with walnuts. This, along with another cake that’ll come up some other time, vanished right on the next day!
Ohh did I mention, our dear electricity board decided to paly spoil sport and cut off the power when my cake was almost 3/4th done and didn’t bother to turn it back on for more than an hour. I however, re-baked for a few extra minutes and thank God, the cake did bake well.

Here’s the recipe…

Eggless Chocolate Walnut cake

Preparation time
: 15 min
Baking time : 35-40 min

Ingredients:
All-purpose flour/Maida – 1 ¼ cups
Cocoa powder – ¼ cup
Sugar – 3/4 cup (The original called for 1 cup)
Baking powder – 1 ¼ tsps
Baking soda – ½ tsp
Salt – a pinch
Thick curd – 1 cup
Cooking oil – ½ cup
Vanilla essence – 1 tsp
Chocolate essence – ½ tsp, optional
Thick coffee decoction – 2 Tbsp or Instant coffee powder – 2 tsp

For topping:
Walnuts – Shelled and chopped into pieces – ¼ cup
Cashews – Chopped into pieces – 2 Tbsp
Brown sugar – 2 Tbsp

Procedure:
• Pre-heat the oven to 200C/400F. Grease an 8 inch pan and set aside.
• Powder the sugar and in a bowl, mix the curd and sugar till the sugar dissolves.
• Stir-in the baking powder and baking soda into the curd mixture. Mix well and set aside for 2-3 minutes. The curd will turn frothy and start rising and increasing in volume.
• In the meanwhile, sieve the flour and cocoa powder thrice and set aside.
• Add the oil, essence and coffee to the curd mixture. Stir gently so that the air in the mixture is not lost.
• Next, gently fold in the flour. Don’t stir very vigorously; do it very gently. The batter should have a dropping consistency.
• Pour the batter into the readied pan and sprinkle the topping mixture generously and lightly tap so that the nuts stick to the batter
• Bake in the pre-heated oven for 10 minutes.
• Lower the temperature to 180C/350F, and bake for another 35-40 minutes, till the toothpick inserted comes out clean
• Once done, remove from oven and let the tin cool on a wire-rack for 10 minutes. Run a serrated knife around the edges and upturn the cake from the tin and let it cool on the wire-rack for a good amount of time before you can slice it.
• Once fully cooled, slice the cake with a serrated knife and enjoy!

Notes:
• Any nuts can be used for topping.
• The cake was not too sweet as is so the addition of brown sugar for topping did not make it too sweet
• Since the nuts are on the top layer, they get toasted on the cake itself, so no need to toast them before.
Now, My dear readers, here’s Wishing you all a Happy and Prosperous New Year 2012!!!
See ya all in 2012!! Tata!!!

Monday, December 26, 2011

Nellikai Chitranna Mix

Mom was not well a couple of months ago and was advised some bed rest. Since she stays quite far off and with my work schedule, I cannot visit her often. So when I went there on weekends, I’d make some ready to eats, and mixes and dosa/idli batter and stock up the refrigerator so that my sis could manage with little effort in the mornings.
This was one of the items I made. Of course, learnt it from mom only! Sis did all the pitting and chopping and grating work and I got the mix ready which was then stocked up in the refrigerator. This mix stays well in the fridge for 2-3 weeks and if using dry coconut, for longer. When you want to have, all you need to do is make some rice and mix with this for a delicious serving of tangy, spicy rice.


Nellikai Chitranna Mix – Gooseberry Rice

Preparation time : 15 min
Cooking time : 10 min


Ingredients:
Gooseberries / Nellikai - ~20 pitted and roughly chopped
Grated coconut - ½ cup
Green chilies - 10-12, as per taste
Asafetida / hing - a generous pinch
Salt - 1 tsp or as per taste
For tempering:
Cooking oil - 1-2 Tbsp
Mustard seeds - 1 tsp
Bengal gram dal - 2 tsp
Urad dal - 2 tsp
Peanuts - 2 Tbsp
Curry leaves - 1 Tbsp
Turmeric - a pinch
Salt - ½ tsp or as per taste

Method:
• Grind the gooseberries, chilies, asafetida, coconut, and salt, in a mixie to form a coarse mixture. Do not add any water
• In a skillet heat oil, add mustard seeds and allow to splutter
• Add groundnut seeds and fry for a few seconds
• Add Bengal gram dal and urad dal and fry till golden
• Add curry leaves and turmeric and fry for a minute or two till all the ingredients are crisp
• Add the ground mixture and mix thoroughly, with the heat on
• Saute it well till the wetness is gone and then turn off the heat; don’t make the mixture too crumbly
• Cool it and store in airtight container in fridge for about 2-3 weeks

Serving Instructions:
• Make rice and spread it so that the grains do not stick to each other
• For every cup of uncooked rice, about 1 Tbsp of the mix should be enough
• Mix well and serve

Notes:
• Dry coconut can also be used, in which case the mix will last longer.

Wednesday, December 21, 2011

Instant Gojjavalakki Mix


Do you travel a lot? Or less? Travel with kids, fussy with food? Or do you get bored of eating out continuously and crave for some home food? Or do you have to leave your kids and travel and want to make sure you keep some ready, healthy mixes for them?

Here is one such instant-food that you can make in bulk and store for a couple of months. When hungry, all you have to do is take a small portion in a bowl, pour some water, hot, warm or even cold and sit for 10 minutes. A bowlful of delicious, homemade flavorful Gojjavalakki is ready!
Mom used to make this for me when I had to travel on work to Seoul before marriage. And it would serve as my breakfast almost on alternate days! It lasted almost the entire two months and still I’d not got bored! And of late I make it for our long nature/birding trips where we need to be outdoors from 5-30 or six in the morning and break for a formal breakfast only by 9 or 10. When our tummies are growling our heads and legs and everything else doesn’t work too!! So we carry small portions of this, soak it with some water and in 10 minutes, we’ll be hogging on it to grab some energy!
I’ve shared it with a lot of friends too and it is always a hit. You must try it, if you want to stock up some ready-to-eats, home-made and with no preservatives.

Instant Gojjavalakki Mix
Preparation time : 15 min
Cooking time : 20 min
Serves : 5-6

Ingredients:
Avalakki/Poha/Beaten rice - 4 cups (Use thick variety)
Tamarind - 1-2 lemon sized ball
Rasam powder - 2 tsp, vary as per your taste
Jaggery - 1 small lemon sized ball
Salt - 1 tsp, vary as per taste
Desiccated coconut, grated - ½ cup

For powdering:
Fenugreek / methi seeds - ½ tsp
Cumin seeds - 2 tsp
Sesame seeds - 2 tsp

For tempering:
Cooking oil - 1 tbsp
Mustard seeds - 1 tsp
Groundnut seeds - 1 tbsp
Chana dal - 1 tsp
Urad dal - 1 tsp
White Sesame seeds - 2 tsp
Curry leaves - 2-3 sprigs
Red chilies - 1
Turmeric - 1 pinch

Method:
• Dry roast all the ingredients under ‘For Powdering’ and when slightly cool, grind to powder and keep aside
• Take the avalakki in a mixie jar and pulse it a couple of times, just enough to break it into very coarse powder. Do not over do this
• Dry roast tamarind on low heat till the moisture is gone. Once cool, grind it to powder in a small mixie jar
• Scrape the jaggery into fine powder
• In a wide bowl, mix tamarind powder, jaggery powder, salt and rasam powder
• Add the broken avalakki, spice powder prepared above into the bowl and mix thoroughly
• Let it sit for sometime, so that the flavors blend well
• Once done, in a big skillet, heat oil and make the tempering:
o Add mustard seeds and allow to splutter
o Turn the heat low, add groundnut seeds, and stir
o After the groundnuts are half-done, channa dal and urad dal
o Add curry leaves and red chili pieces and stir for half a minute till all the ingredients are properly roasted.
o At the end add sesame seeds and turmeric powder
• Add the tempering to the avalakki mixture, add grated coconut and stir well to combine
• Check and adjust the taste if necessary

Serving instruction:
• In a bowl, take dry gojjavalakki (once soaked, it almost doubles, so take just half the volume of what you need finally)
• Add water (warm or cold) till it is immersed fully, and covers about 1 cm above the surface of the avalakki
• Gently mix it once, and let it rest for 15 minutes. At the end of 15 min, all the water would be absorbed, and the gojjavalakki will be of desired consistency. Mix thoroughly and eat.
• Enjoy!

Notes:
• Use very good quality of avalakki, as you will not be washing it here

Wednesday, December 14, 2011

Methi Malai Matar


It was decided that we’d be gathering for a pot luck lunch at a cousin’s place for a party. And I had committed on making a rice item. I was traveling the whole of the week before and returning home only on the previous evening, but I was anyway prepared to cook a Methi Peas pulav. So bought the greens on the way back and came home and picked and cleaned it too. Then the cousin’s wife calls up to say that she has prepared for a pulav herself as she didn’t want me to strain myself as I was traveling.


I had prepared myself for this rice and even my insistence didn’t help. She had even gotten ready for a side dish and chapathis. Then I thought why not make a second side dish and carry, as that would not go waste. I declared to her that I would be getting a second side dish and she couldn’t say no to it.


Since the ready ingredients at hand were Methi and Peas, my obvious choice was Methi Malai Muter. I had been wanting to try it out from a long time and remembered having seen it on Champa’s blog. So opened her blog from my phone and set out cooking next morning!
It did come out well, and everyone liked it. Thanks Champa, for a non-baking recipe. I had doubled the ingredients and made a larger quantity, but here I am using Champa’s quantities. I did make some variations, and here’s the recipe....


Methi Malai Matar

Preparation time : 15 min
Cooking time : 15 min
Serves : 5-6

Ingredients:
Methi / fenugreek leaves - 1 big bunch cleaned and only leaves are picked and chopped
Frozen green peas - 2 cups (If using fresh peas, use boiled and cooked)
Red Onion - 2 big chopped to chunks
Green chillies - 7 or more depending on your taste
Cashews - 1/4 - 1/3 cup
Garlic - 1 pod chopped
Ginger - 1/2 inch piece peeled and chopped
Cloves - 5
Cumin seeds - 1/2 tsp
Cinnamon - 1" stick
Oil - 3 Tbsp divided use
Ricotta cheese / Cottage cheese - 1 cup (optional - to make a rich gravy)
Cream - 1/2 cup
Milk - ¼ cup or enough to thin down the curry to desired consistency
Salt - to taste

Method:
• In a skillet, heat 1 Tbsp of oil. When hot, add cumin seeds.
• When they splutter, add green chillies, garlic, ginger, cloves and cinnamon.
• Sauté till the coves pop. Add cashews and let them toast well.
• Now, add onions and stir. Let it cook stirring occasionally.
• When they are cooked, take it out into a blender or mixie jar.
• In the same pan, heat the remaining 1 Tbsp of oil.
• When hot, add green peas and chopped fenugreek leaves. Sauté till peas are tender.
• Meanwhile blend the ingredients in the blender. You can add a little bit of water to facilitate the blades. But don't make it too runny.
• Add this paste and stir.
• Add the ricotta cheese if using and the cream and stir well.
• Adjust the consistency with milk
• Add salt and let it simmer for couple of minutes and turn off the heat.
• Serve hot or warm with rotis, naans, chapathis or even rice.

Notes:
• I skipped the ricotta cheese - may be it would have tasted richer with it
• Red chili powder can be added to increase the heat

I'm posting this from one of my old drafts as i'm not able to spend time clicking pics and writing with with so much of work at home and at work. I've made this dish many times now, esp for parties and it is always a hit!

Friday, November 25, 2011

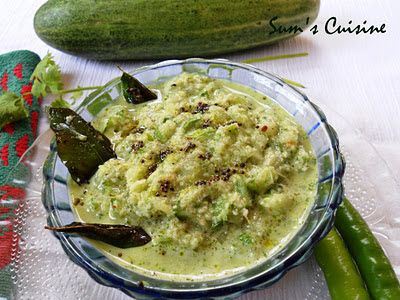
Southekai Hasi Gojju - Cucumber in coconut sauce

A weekday evening and you’re home late and tired. And not to mention, hungry too. You have little energy left, but still don’t want to compromise on a nutritious meal with some veggie. Add to it, whatever you make should go with rice and with chapathis for different people in the house. What is your option then?
Mine, definitely is this Southekayi hasi gojju - cucumber chopped fine and mixed in an uncooked coconut gravy. Why? Because it is the easiest and quickest thing I can make provided I have cucumber in the fridge. And you want to make it still easier? Then you can just grate off the cucumber instead of chopping! All it takes is 10-12 minutes to get this dish done.

It goes well with rice, chapathis or dosas too. And there is no guilt of eating a junk food as you can have a large quantity of water-filled cucumber.
This is an authentic Karnataka cuisine, that mom used to prepare along with rasam for a Sunday lunch, but I prefer making it on a weekday evening mainly because of the little time and effort it takes.

Try it out yourself and see how simple, yet tasty and wholesome it is...

Southekayi Hasi-Gojju

Making time : 15 min
Serves : 4

Ingredients:
Cucumber - 2, medium sized
Coconut - 1/3 cup, grated
Green chilies - 5-6, depending on taste
Fried gram dal - 2 tsp
Curry leaves - 2 sprigs
Coriander leaves - 1 Tbsp, chopped
Cooking oil - 1 tsp
Jaggery - a small pinch (optional)
Tamarind - a small marble sized ball
Salt - ½ tsp or as per taste
Turmeric - 1 pinch
For Tempering:
Cooking oil - 1 Tsp
Curry leaves - A few sprigs
Mustard seeds - 1 Tsp
Asafetida - a pinch, powdered

Method:
• Wash the cucumber, and chop it fine. I like to retain the outer skin for that crunch. You may peel it if you don’t like it that way.
• Meanwhile, roast green chilies, curry leaves in a few drops of oil till they change color
• Allow to cool slightly and grind with coconut, turmeric, salt, tamarind, jaggery, coriander leaves, adding a little water if needed
• If you like to have more of gravy, add a tbsp of chopped cucumber and grind along
• Transfer the ground chutney to a serving bowl
• Mix the finely chopped cucumber
For tempering / tadka:
• Heat the oil in a pan, add mustard and allow to splutter
• Add curry leaves
• Garnish with tadka

Notes:
• Do not grind the spices too smooth – a little coarse consistency will give a better taste
• In place of fried gram, you can also roast an equal amount of chana dal and use
• Chopping fine is actually a simple task in case of cucumbers; just hold it perpendicular to the board and randomly hit with a knife perpendicular to it and then slice off the chopped portion; you’ll get fine chops easily this way
• If you want to make the process of chopping easier, you may even grate it in a big grater


Sunday, November 20, 2011

Hunase Saru - Tamarind Rasam

Summer is long gone here and the days are generally cool and pleasant with some days gloomier. And there are some really gloomy days in between, with no trace of sun, esp a few days back. Such weather generally demands some thing hot to sip on, something that tickles the tongue.
On one such gloomy weekend, my FIL had this desire to sip a glass of hot, tangy tamarind rasam. He fondly complained that it has been ages since it was made at home. I remembered my mom making it on such days and we all sipping it in glasses.
So made this to fulfill my FIL’s demand and also to go back to those childhood days of having it.... it tuned out great and FIL was happy. Very simple to make, with not much of preparation required, it also tastes good with rice also.
Here’s how to make it....

Hunase Saru / Tamarind Rasam

Preparation time : 5 min
Cooking time : 10 min
Serves : 4

Ingredients:
Tamarind - 1 big lime sized ball, soaked in water till soft
Salt - 1- 1 ½ tsp or as per taste
Jaggery - 1 big marble sized ball / about 1 Tbsp powder
Coriander - A few sprigs
Curry leaves - 2 sprigs

For tadka / Tempering / Oggarane:
Cooking oil - 1 tsp
Mustard seeds - 1 tsp
Cumin seeds - 1 tsp
Dry red chilies - 4-5, as per taste
Asafetida - a small pinch
Turmeric - a pinch

Method:
• Squeeze the soaked tamarind pulp and collect a thin tamarind juice in a vessel
• Add salt and jaggery and bring to boil
• Adjust the consistency by adding enough water - it should be quite runny
• Add the coriander and curry leaves and boil for a couple of minutes

For tadka / Oggarane
• Heat the oil in a pan, add mustard seeds and cumin seeds and allow to splutter
• Add dry red chili pieces
• Add asafetida
• Garnish the rasam with tadka
• Serve hot, with piping hot rice or in a small glass to just drink
Notes:
• This is a very a light rasam, but the right combination of sour-salt-and sweetness makes it a wonderful tongue tickler
• Tastes good to drink as is too


Tuesday, November 15, 2011

Cabbage Rice (Kai Sasive Anna)


Ok, I had a long ‘vacation-of-the-year’ and back. After the vacation, it was my BIL’s engagement, which took most of my time with preparations, shopping, etc! I’m now ‘Badi Bahoo’ :P, so more responsibilities!

In between all these, there was also this Bangalore Food Bloggers’ meet last Saturday, where some 20+ people met up, ate and had fun! Thanks to Madhuri who arranged it all. Here’s a pic of all of us :)

Now I’m back to routine, but still not been able to catch up with so many things! With full time office, and so many hobbies and activities, I feel I hardly get enough time for anything! Wish there were many more hours in a day ;)

Now to today’s recipe.... this is one very simple and wholesome rice item, with lots of cabbage in it. Chop the cabbage fine or even shred it, which is the only time consuming part. I use the hand held vegetable chopper esp for this and I get very finely chopped cabbage in a few minutes! Makes a good lunch box item.

Here’s the recipe...

Cabbage Rice (Kai sasive anna)

Preparation time : 10 min, excluding time to prepare rice
Cooking time : 15 min
Serves : 4

Ingredients:
Cooked rice - 4 cups, sona masuri variety
Cabbage - 2 cups, finely chopped
Grated coconut - 2-3 Tbsp
Green chilies - 5-6, as per taste
Mustard seeds - ½ tsp
Tamarind - a small marble sized ball (optional)
Salt - 1 tsp or as per taste
Coriander leaves - for tempering
For tempering:
Cooking oil - 1-2 Tbsp
Mustard seeds - 1 tsp
Bengal gram dal - 2 tsp
Urad dal - 2 tsp
Peanuts - 2 Tbsp
Curry leaves - 1 Tbsp
Turmeric - a pinch
Salt - ½ tsp or as per taste

Method:
• Spread the cooked rice in a wide bowl and add a teaspoon of oil so that the grains do not stick
• Keep aside for 5 minutes to cool
• In a pan, heat oil and make tempering:
• Add mustard seeds and allow to splutter
• Add groundnut seeds and fry for a few seconds
• Add Bengal gram dal and urad dal and fry till golden
• Add curry leaves and turmeric and fry for a minute or two till all the ingredients are crisp
• Transfer the tempering to a bowl and pour back only the oil into the pan, carefully
• Add finely chopped cabbage and cover with a lid and let cook on low heat
• If needed, sprinkle some water and stir occasionally
• Meanwhile, grind the green chilies, coconut, tamarind, salt, ½ tsp of mustard seeds in a mixie to form a coarse mixture. Do not add any water
• Add the ground mixture to the cooked cabbage and mix thoroughly, with the heat on
• Once the mixture is well sautéed, turn off the heat
• Add this and the reserved tempering to the spread rice and mix thoroughly
• Serve warm or pack it off for lunch box!

Notes:
• Make rice with a bit lesser water, so that the grains are separate and not sticky


Tuesday, November 1, 2011

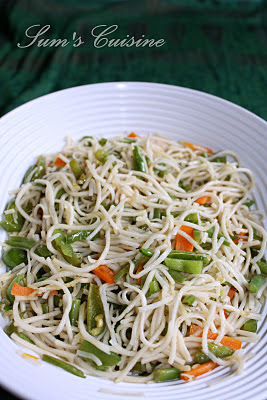
Vegetable Noodles

After introducing my in-laws to Noodles, with the help of this South Indianized Noodles, a fusion recipe with our own traditional flavors going into noodles, this Chinese version also got accepted! Why just accepted, it became a super hit, esp with my FIL! To an extent where he'd want it for breakfast!!


This being one of the most famous Indo-Chinese food, is usually a hit among most people, and especially with kids. Very easy to make, provided you have the things in hand and can be a one pot meal.

We like the flavors subtle, so I add the soy sauce, vinegar and ajinomoto in smaller quantities. Go ahead and increase the quantities if you like stronger flavors.

Here’s the recipe...

Vegetable Noodles

Preparation time : 10-15 min
Cooking time : 15 min
Serves : 4-5

Ingredients:
Chinese Noodles - 250 g
Water - 8 cups
Green chilies - 5-6, as per taste or chili sauce
Garlic - 4-5 cloves
Cooking oil - 2-3 Tbsp
Vegetables (Beans, Carrot, Capsicum, spring onions) - 2 cups, chopped
Onion - 2 medium sized, chopped fine - I didn’t use
Soya sauce - 1 Tsp
Vinegar - 2 tsp
Ajinomoto - a pinch
Salt - 1 tsp or as per taste
Pepper powder - ¼ tsp, optional (adjust as per your taste)

Method:
• In a large pan bring water to boil
• Add a pinch of salt, a few drops of oil and add the noodles
• Cook for a couple of minute till just done - or as per the instructions on the packet
• When done, pour it over a colander to drain the water and separate the noodles with a fork
• Keep aside for 5 minutes to cool
• In a pan, heat oil and add green chilies, chopped onion, sauté till the onion is translucent
• Add the vegetables, sprinkle some salt and let it cook on medium heat
• When almost done, add soya sauce, vinegar and ajinomoto and mix well
• Mix in the spread noodles and add the remaining salt
• Add pepper powder if you prefer it hot
• Mix thoroughly and let the ingredients combine well with the noodles
• Serve warm with a Manchurian or just tomato ketchup!


Monday, October 24, 2011

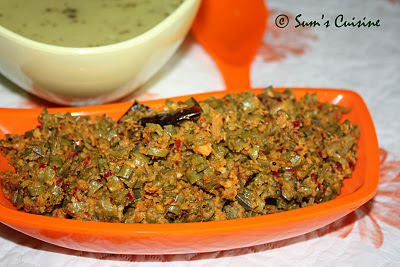
Gorikai Matodi Palya - Cluster beans and lentil stir fry

Amongst the authentic Kannada recipes that I have posted, the most famous and sought for recipe is the Matodi palya, made out of methi leaves. It is my mom’s trademark recipe and one of my personal favorites too.

Here’s another similar stir fry, but with cluster beans. This is also a traditional recipe that I’ve heard from my grand mother but for some reason, we don’t make it often. Recently when the only vegetable I had in the fridge was cluster beans, I thought of giving this a try rather than a boring plain palya.
Like its counterpart, it has soaked dal ground and cooked with the beans. The flavors, though simple are amazing. Since my FIL likes it not being too dry, I made it a little moist this time; you can adjust the consistency to your choice. However, if its dry, its shelf life will be more.
Some people call it matwadi palya as well. Whatever the name is, it is as good as the methi version.

It takes in very few ingredients and easy to make too. Here’s the recipe....

Gorikai Matodi Palya - Cluster beans and dal stir fry

Preparation time : 10 min
Cooking time : 25 min
Serves : 4-5

Ingredients:
Chana dal - ¾ cup
Cluster beans - 3 cups, washed and finely chopped
Coconut - ½ cup, grated
Green chilies - 4-5, optional. Else increase the red chilies
Dry red chilies - 5-6, vary as per taste
Coriander seeds - 1 tsp
Asafetida / Hing - a generous pinch
Cooking oil - 2 Tbsp
Mustard seeds - 1 tsp
Turmeric - a pinch
Salt - ½ tsp or as per taste

Method:
• Wash and soak chana dal for at least 2 hours
• Wash cluster beans and chop finely
• Once the dal is soaked well, grind it along with chilies, hing, salt and coconut and salt to a coarse mixture. Do not add any water for grinding
• In a non stick / heavy bottomed pan, heat oil and add mustard seeds allow to splutter and turmeric
• Add the chopped cluster beans and sauté for 5-6 minutes, till the cluster beans are half cooked; sprinkle a few drops of water if necessary to cook the beans
• Add the ground mixture and mix thoroughly
• If you prefer a slightly moist curry, add a bit more water
• Cook well for at least 10 minutes on medium heat. Stir frequently and ensure the mixture is evenly cooked.
• Turn off the flame and let it cool. This can be saved in refrigerator for 2-3 days and outside for 2 days when cooked well.
• Serve with hot rice and a teaspoon of oil.

Notes:
• Do not grind the ingredients very finely. Let it be coarse and let there be a few whole grains of dal. This adds a nice taste and texture to the end product.


Wednesday, October 19, 2011

Eggless Chocolate Cake with whipped cream topping

When it was time for some cousins staying across seas to visit us, I had decided I had to bake something. And I baked this chocolate cake for them the previous evening. It came out very nice in all respects, except that it kinda stuck to the pan :(. It was not a big deal as I anyway wanted to serve as squares, serve along with vanilla ice cream and chocolate sauce, topped with some toasted nuts. And everyone enjoyed it, including those who didn’t at all have a sweet tooth, and I was flattered with compliments!

The next time I made it for a friend’s birthday, this time lining the pan with parchment after the previous experience. I wanted to try out my whipping cream powder bought a couple of months ago, but still untouched in the fridge. So, after office I headed straight into the kitchen and got started with the cake. And while the cake was cooling, I gathered courage to whip the powder.
Guess what? I don’t have electric hand mixer, and believe me, I used the manual one, where you need to press the handle for the blades to turn!! It is quite a bit of effort, but was totally worth it! Proves that nothing can stop you, once you’re determined!!
And I topped the cake real fast, as I didn’t want to visit her at midnight!! Yeah, I know it’s a clumsy work, but then, I was happy to have used whipped cream and it did taste YUMMY!!
And I baked it for a third time, for in-laws’ anniversary party and this time, the decoration was better! It was pretty easy and quick, but with D’s help for whipping the cream by hand.

If you don't want to bake with eggs and LOVE chocolate cake, this is the recipe!

Eggless Chocolate Cake (with Vinegar) - With Whipped cream decoration!

Preparation time : 10 min
Baking time : 35-40 min
Recipe Source: Madhuri’s Cook Curry Nook

Ingredients:
All purpose flour (or Maida) – 1 ½ cups
Unsweetened Cocoa powder – ¼ cup
Sugar – 1 cup
Baking Soda – 1 tsp
Salt – a pinch
Cooking oil – ½ cup
Distilled White Vinegar – 1 Tbsp
Vanilla essence – 1 tsp
Instant Coffee powder (optional) – 2 tsps or Strong Coffee decoction - 2 Tbsp
Warm water – 1 cup (minus 2 Tbsp if using decoction instead of coffee powder)

For Cream decoration:
Whipping cream powder - ¾ cup or more if you want more of cream :)
Chilled water - ½ cup - used as necessary
Vanilla essence - a few drops

Procedure:
• Pre-heat oven to 180°C /350°F. Line and grease a 9-inch round pan and set aside. I used two smaller pans
• Sift together the flour, unsweetened cocoa powder, baking soda and salt. Set aside.
• In a large bowl, combine the sifted mixture, sugar and instant coffee powder (if using).
• Add water, oil, vinegar and vanilla essence and decoction if using and stir with a balloon whisk until just combined.
• Pour batter into readied pan, and bake for 35-40 minutes or till done.
• Cool completely on a wire rack.

Decoration:
• Chill a bowl, beater blades in freezer before starting to whip
• Chill water too in the freezer, but let it not form into ice
• Take out the whipping cream powder and the other stuff from freezer just before beginning the process
• In the chilled bowl, add the powder and add a few tablespoons of water and start beating
• Add more water depending on the consistency you need and continue
• As is said above, I used a manual beater/churner and it took me 6-8 minutes for peaks to appear
• I was scared of over-whipping and stopped after a couple of minutes more and the result was a fluffy cream
• Keep this refrigerated till the cake is cool
• Once the cake is completely cool, spread the cream on the surface of the cake and decorate as you please
• I sprinkled some chocolate shavings on top and placed some glazed cherries and voila! It was yummyyyyyy.

Notes:
• The cake stuck to the pan first time. So generously grease and dust the pan or line with parchment for easy removal.

Friday, October 14, 2011

Burnt Brinjal Chutney


FIL being a big fan of brinjals and eggplants, gets them almost every time he buys vegetables! But making the same thing over and over again does not interest me, nor him. So depending on what the brinjal side dish needs to go with, there will be a different item being dished out.

Be it a simple stir fry, or the more regular Burnt eggplant in coconut chutney, or a special Ennegai, or this chutney to be a little different, it is his favorite for sure!
This is quite easy to prepare - cook the brinjal on stovetop till the outer skin is browned, after which the skin is removed and ground with other ingredients to make a chutney. Tastes great with chapathis, rottis, esp Ubbu rotti, dosas and even with rice. It can be made with other round eggplants too, but this one tastes better.
Making time : 15 min
Serves : 4 -5

Ingredients:
Brinjals - 3, medium sized, slender green ones
Coconut - 2 Tbsp, grated
Green chilies - 5-6, depending on taste
Fried gram dal - 2 tsp
Curry leaves - 2 sprigs
Coriander leaves - 1 Tbsp, chopped
Cooking oil - 1 tsp
Jaggery - a small pinch (optional)
Tamarind - a small marble sized ball
Salt - ½ tsp or as per taste
Turmeric - 1 pinch
For Tempering:
Cooking oil - 1 Tsp
Curry leaves - A few sprigs
Mustard seeds - 1 Tsp
Asafetida - a pinch, powdered

Method:
• Wash the brinjals, make sure there are no holes on the outer skin, which means there might be bugs inside
• Smear a few drops of oil over the brinjal
• Switch on the gas and place these brinjals directly over the flame
• Turn it around every now and then and ensure an even darkening of the outer skin. This will take around 2 minutes per brinjal.
• Poke the back of a spoon or a knife to check if it is cooked soft inside. Note that these need not turn completely black, just the wilting of outer skin is sufficient
• Repeat this for all the brinjals and set aside to cool
• Meanwhile, roast green chilies, curry leaves in a few drops of oil till they change color
• Once the burnt brinjals are cool enough to handle, peel the outer browned skin.
• Mash it lightly and grind with coconut, turmeric, salt, tamarind, jaggery, coriander leaves, adding a little water if needed
• Transfer the ground chutney to a serving bowl
For tempering / tadka:
• Heat the oil in a pan, add mustard and allow to splutter
• Add curry leaves
• Garnish with tadka

Notes:
• Do not make the chutney too smooth – a little coarse consistency will give a better taste
• You can just bake the brinjal in oven too. But make sure to prick some holes all over, to prevent it from bursting inside the oven!


Monday, October 10, 2011

South-Indianised Noodles!


Don’t you agree that older people are generally hesitant to explore different cuisines and newer tastes? At least I’ve had that experience many a times! We like to explore different cuisines, different tastes, like to experiment with food more often whereas parents and in-laws find it a bit of a challenge to adapt!

While most of the time it is traditional, authentic Indian food that is cooked at home, we sometimes want to have some international food or some other non-native food! Some examples being pastas, pizzas, chinese, etc. Some of the foods will be readily accepted, some will be out-rightly rejected and some need some acclimatization!

One such that belongs to the latter category is Noodles. While we love the Indo-Chinese version of the noodles, the initial few times, it was outrightly rejected. But recently there was some affinity towards it. But FIL was not yet sure about his liking towards the Chinese variety, so he asked me to make a totally Indian version too, similar to our very own Chitranna (err.. should I call it chitra-noodles!?!?!)

Whatever you name it, I divided the cooked noodles into two parts and made this in one part and the Indo Chinese way with the other. And when serving I did serve this first which he did like, and then gave a sample of the other one.

Whew, he asked for a second serving!! When asked which one, he wanted both of them!! And all he had for lunch that day was noodles, though I had made rice and rasam also to be on the safer side! Now I need not worry about the acceptability of another cross cultural cuisine!

Well, did I mention, this version is also equally good, with our own Indian spices going in to give our own taste to the Chinese -noodles?

South-Indianised Noodles

Preparation time : 10 min
Cooking time : 10 min
Serves : 5-6

Ingredients:
Chinese Noodles - 250 g
Water - 8 cups
Green chilies - 5-6, as per taste or chili sauce
Cooking oil - 2-3 Tbsp
Mustard seeds - ½ tsp
Urad dal - 1 tsp
Turmeric - a big pinch
Green Peas - ½ cup
Curry leaves - a couple of sprigs
Fresh coconut - 2 Tbsp, grated
Coriander leaves - abt a Tbsp, chopped fine
Salt - 1 tsp or as per taste

Method:
• In a large pan bring water to boil
• Add a pinch of salt, a few drops of oil and add the noodles
• Cook for a couple of minute till just done - or as per the instructions on the packet
• When done, pour it over a colander to drain the water and separate the noodles with a fork
• Keep aside for 5 minutes to cool
• In a pan, heat oil, add mustard seeds and allow to splutter
• Add urad dal, slit green chilies, curry leaves and sauté
• Add green peas and let it cook till tender
• When almost done, add turmeric, grated coconut and salt and mix well
• Mix in the spread noodles and chopped coriander leaves
• Mix thoroughly and let the ingredients combine well with the noodles
• Serve warm!


Wednesday, October 5, 2011

OraLukallu Chitranna - Spicy Red Chili Rice


Wish you all a Happy Navarathri / Dasara!

We arrange dolls for Navarathri every year and every year we try to make it a little different from the previous years. Check out some more pics of this year’s Gombe here.

I’ve been so so buys these days, with the Navarathri arrangements, guests at every hour of the day, office, functions, we visiting friends/families and also cooking some snacks for Bombe-Bagina - some snack to be given to guests who come home to see the doll arrangements. But then being too pressed for time, I’m not being able to click pics of all of them, write and post.... So they’ll all come some time later, when I’m relatively free.
For now, here is a traditional rice item, mostly made for festive meals, called OraLukallu Chitranna. OraLukallu, in Kannada, means the traditional grinding stone they used to be preset in every kitchen before we had these mixers, grinders and food processors. We can still find them in some houses.
The spices for this chitranna will be ground fresh in the OraLukallu and thus the name. However, now we make it using our dear mixie, in a jiffy! It is quick, spicy, yummy and makes a perfect rice for your festive meal.

Here’s the recipe....

OraLukallu Chitranna

Preparation time : 5 min, excluding time to prepare rice
Cooking time : 10 min
Serves : 4

Ingredients:
Cooked rice - 4 cups, sona masuri variety
Grated coconut - ½ cup
Dry red chilies - 5-6, as per taste; Use Byadagi variety for a nice color
Asafetida / hing - a generous pinch
Mustard seeds - ½ tsp
Tamarind - a small marble sized ball
Salt - 1 tsp or as per taste

For tempering:
Cooking oil - 1-2 Tbsp
Mustard seeds - 1 tsp
Bengal gram dal - 2 tsp
Urad dal - 2 tsp
Peanuts - 2 Tbsp
Curry leaves - 1 Tbsp
Turmeric - a pinch
Salt - ½ tsp or as per taste

Method:

  • Spread the cooked rice in a wide bowl and add a teaspoon of oil so that the grains do not stick
  • Keep aside for 5 minutes to cool
  • Grind the red chilies, asafetida, coconut, tamarind, salt, ½ tsp of mustard seeds in a mixie to form a coarse mixture. Do not add any water
  • In a skillet heat oil, add mustard seeds and allow to splutter
  • Add groundnut seeds and fry for a few seconds
  • Add Bengal gram dal and urad dal and fry till golden
  • Add curry leaves and turmeric and fry for a minute or two till all the ingredients are crisp
  • Add the ground mixture and mix thoroughly, with the heat on
  • Once the mixture is well sautéed, turn off the heat; don’t make the mixture too crumbly
  • Add this to the spread rice and mix thoroughly
  • Serve warm or pack it off for lunch box!

Notes:

  • Make rice with a bit lesser water, so that the grains are separate and not sticky

Tuesday, October 4, 2011

100 Diwali Sweet Recipes-Free E-Book from Indusladies

Saw this at Gayathri's Cook Spot and thought of sending one of my recipes too...

I am sending the most popular sweet post in my blog : Badam Puri

So here is the Announcement From Indusladies, copied and pasted :):

For the upcoming Diwali on October 26th, 2011, Indusladies is compiling an E-Book called “100 Yummy Diwali SweetRecipes”. We are collecting sweet/dessert recipes from various bloggers to be featured in this E-Book.

This E-book will be made available as a free download to our community's 1.3 Lakh+ members. In addition, we will also be making this E-Book available to our 9000+ Facebook fans and Twitter followers. It's LOTS and LOTS of exposure to those food blogs entering the E-Book!! We believe this would be a nice way to get the word out about a wonderful blog to the entire membership of IndusLadies!!

Those bloggers interested in submitting a recipe for this E-Book...all you need to do is as follows:
1. Send a link from your blog for a sweet /dessert recipe. It should also include the picture of the sweet/dessert. Your recipe, food picture, recipe URL as well as the entire blog URL will get featured in the E-Book.
2. In return, we need you to do two things:
- Now make a blog post in your blog announcing the E-Book compilation by IndusLadies and the recipe you are sending for this E-Book. That way inviting your co-bloggers interested to send in their contribution by Oct 10th,2011.

Any blogger interested can send their entry to partners@indusladies.com by October 8th.


Monday, September 26, 2011

Chili Babycorn Capsicum


I hate deep fried starters especially when entertaining large crowds. That’ll make me confine to the kitchen when the guests arrive, and by the time I come out and manage to sit with them, I’ll be like a burnt veggie myself, after batches and batches of deep frying!!

This one is a no-fry quick fix starter, that fits well when cooking for large groups as well. Keep all the veggies ready and it can be made in a jiffy. The spices and other ingredients can be varied as per your tastes.

Chili Babycorn Capsicum

Preparation time
: 10 min
Cooking time : 20 min
Serves : 4-5

Ingredients:

Baby corn - ~15
Capsicum - 1, slit into 1” thin strips
Onion - 3 medium sized
Cooking oil - 2 Tbsp
Garlic - 4-5 cloves
Green chilies - 2-3, chopped fine or slit
Red chili powder - ½ -3/4 tsp
Ajinomoto - 1 pinch, optional
Salt - ½ tsp, vary acc to taste
Vinegar - 1 tsp
Soya sauce - 1 tsp
Tomato ketchup - 2 Tbsp
Pepper powder - 1 tsp, optional (adjust as per your taste)

Method:
• Chop onions into quarters and capsicum into bite sized chunks
• Slit the baby corn and chop into bite size pieces
• Meanwhile in a wide pan, heat 1 Tbsp oil and add chopped onion, garlic and green chilies
• When done, add capsicum and sauté for a few seconds - don’t over cook the capsicum, retain the crunchiness
• Transfer to a bowl and keep aside
• In the same pan, heat remaining oil and fry the baby corn
• Cook covered on low flame till tender
• Mix in the reserved onion and capsicum
• Add salt, sauces, vinegar, ajinomoto if using and stir thoroughly
• Adjust salt and pepper as per taste and optionally garnish with some chopped scallions and serve hot
• Goes well with flavored rice as an accompaniment, or as a starter as is

Notes:
• Make sure this is not made much ahead, as the veggies tend to become over tender if kept for long. Tastes the best when served immediately
• The quantity of sauces used can be varied as per your taste - no hard and fast rule on the exact measures