Showing posts with label Chutneys 'n Dips. Show all posts

Tuesday, June 4, 2013

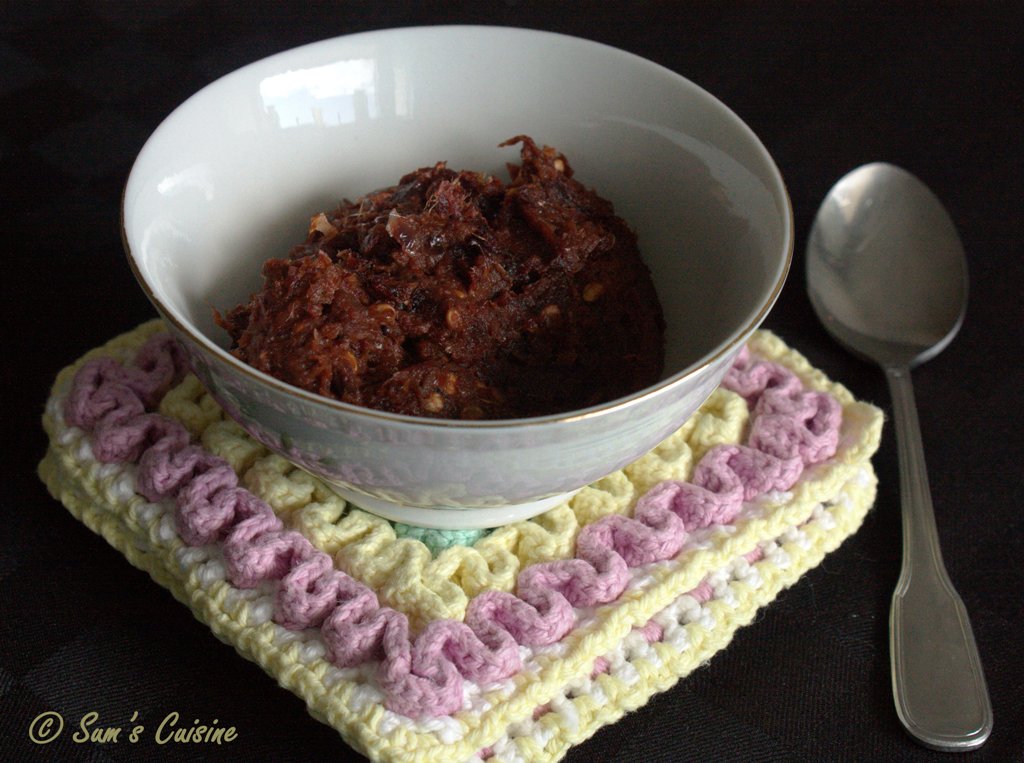
Ridgegourd-Peel Chutney


When it came to cooking, our grand mothers never threw off the peels, seeds and rinds of so many veggies. They probably knew it that these 'wastes' do contain many nutrients and fiber  in some cases more than the actual veggie or fruit and can be put to better use than dumping it into the trash. And so some very good, amazing tasting delicacies were churned out, disguising the main ingredient so well that everyone who ate it would love the taste and not bother to know what has gone inside!


The same was carried over by my mom and MIL as well and thus it continues with me too! The list is endless, with chutneys made from veggie peels/seeds, dosas with rind of watermelon, methi stalks (recipe soon to follow), gojju with jack fruit seeds, and so on. 


One of my favorites till date is the chutney made from ridge-gourd (heerekai) peel. Mom usually made tovve (dal) with the ridge gourd and the peel was used to make chutney, as an accompaniment. That used to be one of my most favorite meals! She used to make sure that the chutney is ground just a few minutes before meal time so that the roasted lentils that went into it were still crisp in the chutney and gave a nice texture when mixed with hot rice with a spoonful of oil or ghee!! What a combination!!


So, next time you are about to throw off the peel, stop and turn it into a nice delicacy! Here's the recipe...

Heerekai sippe / Ridge gourd peel chutney

Preparation time : 5 min
Cooking time : 5 min
Serves : 4 -6

Ingredients:
Heerekai / Ridge gourd peel - from 1 big or 2 small ones - don't peel too much, just the outer ridges would do
Coconut - 1/2 cup, grated
Dry Red chilies - 5-6, depending on taste
Chana dal / Toor dal - 1 Tbsp
Cooking oil - 1 tsp
Tamarind - a small marble sized ball
Coriander and Curry leaves - 1-2 sprigs each
Salt - ½ tsp or as per taste

For Tempering:
Cooking oil - 1 tsp
Curry leaves - A few sprigs
Mustard seeds - 1 tsp
Hing/asafetida - a pinch

Method:
• Roast chana/toor dal, red chilies, curry leaves in a tsp of oil till the lentils change color
• Add the peel to it and continue roasting till the raw smell is gone from the peel
• Let it cool slightly
• Grind the above with all other ingredients, adding a little water. Do not make it into a fine paste - a bit of texture gives a better tasting chutney
• Transfer the ground chutney to a serving bowl
For tempering / tadka:
• Heat the oil in a pan, add mustard and allow to splutter
• Add curry leaves and hing
• Garnish the chutney with tadka

Notes:
• Do not make the chutney too smooth – a little coarse consistency will give a better taste
• Can use chana dal / toor dal or even urad dal or a combination of them
• The chutney tastes good with dosas, rottis too.

Monday, November 26, 2012

Hummus - the versatile Middle Eastern Dip


Hummus had been on my list to try for a long time. Somehow i had not made it, surprisingly for it is such a simple dip with all the ingredients I almost always have. Finally i made it along with Falafel, a fritter with chickpeas and pita bread (recipes will soon follow).


Hummus is a dip/spread that is made from chickpeas/garbanzo beans. In fact, hummus is the Arabic word for chickpea. It is apparently one of the oldest foods dating back to ancient Egypt.

There are so many variations for the recipe of Hummus, just like our chutney, fo example. Each one has their own preference for ingredients, and their quantities, spice and salt level and so on. The only common factor being Garbanzo beans and Olive oil. Some versions use Tahini - a paste of roasted sesame seeds and olive oil and some do not. I have however made tahini as well and added it to my version of hummus.
Here's my version...

Hummus - The versatile Middle Eastern Dip

Prep Time: 10 minutes
Cooking Time: ~30 min to cook the beans, none after that

Ingredients:
Chickpeas or garbanzo beans - 1 cup, washed and soaked overnight
Lemon/lime juice - 2 Tbsp (adjust acc to taste)
Tahini - 2 Tbsp - Recipe below
Garlic - 2 cloves
Red chili powder - 1/2 tsp, optional
Parsley - 2 Tbsp, chopped
Roasted Cumin powder - 1/2 tsp, optional
Salt - 1/2 tsp
Olive oil - 2-3 Tbsp

For Tahini
White sesame seeds - 2 Tbsp, roasted
Olive Oil - 1 Tbsp

Preparation:
  • Cook chikpeas in enough water till well cooked - for about 30 minutes. Drain and set aside. Reserve some of the water used for cooking
  • Roast white sesame seeds and grind it to a paste along with olive oil to make tahini paste.
  • Combine the chikpeas, tahini and the remaining ingredients in blender or food processor. Add 1/4 cup of liquid from boiling the chickpeas.
  • Blend for 3-5 minutes on low until thoroughly mixed and smooth.
  • Place in serving bowl, and create a shallow well in the center of the hummus.
  • Add a small amount (1-2 tablespoons) of olive oil in the well.
  • Garnish with parsley (optional).
  • Serve immediately with fresh, warm or toasted pita bread or falafel or cover and refrigerate for later use.
  • Stays fresh in fridge for about 3 days.
Notes:
As said earlier, there are a number of possibilities to experiment with this simple dip. Vary your spices, add your favorites and try out.


Tuesday, July 3, 2012

Baked Aloo Tikki with Green Chutney


I’ve made aloo tikkis a couple of times before, but not the baked version. Back home, while cooking for a sizeable party, shallow frying the tikkis felt too elaborate; esp with all the other items to be taken care of alongside. Though the idea of baking would cross my mind, with the small oven that I had, baking them would mean more time consuming, so never bothered to try.
Now that I have a big oven here, wanted to try out the baked version. Also because I need to keep a check on the calories! With all the cooking experiments I’m making, I’m afraid we’ll both bloat up by the time we return to India!! Of course potatoes are a high-cal food, but I felt baking does reduce the amount of oil that went in and also saves time.

I’ve not used bread crumb to coat, instead used chickpea flour in the mixture for binding.
Here’s the recipe…

Baked Aloo Matar Tikkis

Ingredients:
Potatoes – 4 medium sized
Green Peas – ¾ cup
Green chilies – 2, chopped
Garlic - 1 tsp, chopped
Ginger - 1 tsp, chopped
Coriander leaves – 2 Tbsp, chopped
1 tsp chat masala (or garam masala)
Gram flour – 2 Tbsp
Salt to taste
Olive oil – to brush the patties (or any other oil)

Method:
  • Boil the potatoes. Cool, peel the skin and mash them well
  • Boil green peas till tender and drain out the water
  • Mix potatoes, peas and add the rest of the ingredients and mix well
  • If the mixture feels very sticky add a bit more of the gram flour
  • Line the baking tray with foil. Grease slightly with oil.
  • Make small balls out of the potato mixture and flatten them over the prepared baking sheet
  • Keep it in fridge for a few minutes to set well
  • Preheat the oven to 220C
  • Bake it for 15 - 20 min, or until the crust turns golden
  • Serve hot with Green chutney

Green Chutney


Almost all the north Indian starters like tikkis, kababs, etc taste good only with this green chutney! I’m not much of a ketchup person for Indian snacks; I’d rather prefer a chutney that’ll go well with the dish.

With a huge bunch of mint and coriander bought from the local market, I needed no excuse to make this chutney for the aloo tikkis :)

Ingredients:
Mint leaves – ½ cup
Coriander leaves – ½ cup
Green chilies – 2 or to taste
Thick Curd – 2-3 Tbsp
Lime juice – 1 tsp
Salt to taste

Method:
  • Take all the ingredients in a blender and blend till smooth
  • Do not add water, the curds should facilitate the blades
  • Adjust the consistency with more curd if required
  • Serve with any north Indian starter/snack or chats

Wednesday, June 20, 2012

Eerulli / Onion Chutney


Being so used to coconut based dishes as we are, it was a bit of a challenge for me to cook everything without coconut in the initial days here. This was specially true in case of chutneys. I hadn’t found coconut even in the nearby Indian store here and I was left with no option but to try out non coconut chutneys.


This is quite an old recipe, basically my moms, which was one of my regulars when I was in Korea way back. Paired with akki rotti, it was a hit then with my friends too. So here again, my akki rotti was paired with this simple onion chutney, which takes very few ingredients, but is awesome for rotti, dosas and even for rice mixed with a spoon of oil. One of my favorites!

Eerulli Chutney / Onion Chutney

Preparation time       : 5 min
Cooking time             : 10 min
Serves                         :  4

Ingredients:
Onions             - 2 medium sized, chopped roughly
Red chillies      - 5-6
Cooking oil      - 2-3 Tsp
Mustard seeds            - 1 tsp
Salt                  - ½ tsp or as per taste

Method:
  • In a thick bottomed pan, heat one ysp of oil and roast the red chilies
  • When done, transfer it to a blender/mixie jar and sauté chopped onions in the same pan till translucent.
  • Allow the onions to cool and when cool, grind it with the red chiles to a thick paste without adding any water
  • Hear the remaining oil in the same pan and add mustard seeds
  • When they splutter, add the ground paste and sauté till all the water content evaporates
  • Tastes awesome with rottis, dosas and rice
Notes:
  • You may add a small piece of tamarind, but I prefer mine without
  • This chutney stays in fridge for over a week if sautéed well
  • Making this in a non stick pan takes very little oil

Friday, October 14, 2011

Burnt Brinjal Chutney


FIL being a big fan of brinjals and eggplants, gets them almost every time he buys vegetables! But making the same thing over and over again does not interest me, nor him. So depending on what the brinjal side dish needs to go with, there will be a different item being dished out.

Be it a simple stir fry, or the more regular Burnt eggplant in coconut chutney, or a special Ennegai, or this chutney to be a little different, it is his favorite for sure!
This is quite easy to prepare - cook the brinjal on stovetop till the outer skin is browned, after which the skin is removed and ground with other ingredients to make a chutney. Tastes great with chapathis, rottis, esp Ubbu rotti, dosas and even with rice. It can be made with other round eggplants too, but this one tastes better.
Making time : 15 min
Serves : 4 -5

Ingredients:
Brinjals - 3, medium sized, slender green ones
Coconut - 2 Tbsp, grated
Green chilies - 5-6, depending on taste
Fried gram dal - 2 tsp
Curry leaves - 2 sprigs
Coriander leaves - 1 Tbsp, chopped
Cooking oil - 1 tsp
Jaggery - a small pinch (optional)
Tamarind - a small marble sized ball
Salt - ½ tsp or as per taste
Turmeric - 1 pinch
For Tempering:
Cooking oil - 1 Tsp
Curry leaves - A few sprigs
Mustard seeds - 1 Tsp
Asafetida - a pinch, powdered

Method:
• Wash the brinjals, make sure there are no holes on the outer skin, which means there might be bugs inside
• Smear a few drops of oil over the brinjal
• Switch on the gas and place these brinjals directly over the flame
• Turn it around every now and then and ensure an even darkening of the outer skin. This will take around 2 minutes per brinjal.
• Poke the back of a spoon or a knife to check if it is cooked soft inside. Note that these need not turn completely black, just the wilting of outer skin is sufficient
• Repeat this for all the brinjals and set aside to cool
• Meanwhile, roast green chilies, curry leaves in a few drops of oil till they change color
• Once the burnt brinjals are cool enough to handle, peel the outer browned skin.
• Mash it lightly and grind with coconut, turmeric, salt, tamarind, jaggery, coriander leaves, adding a little water if needed
• Transfer the ground chutney to a serving bowl
For tempering / tadka:
• Heat the oil in a pan, add mustard and allow to splutter
• Add curry leaves
• Garnish with tadka

Notes:
• Do not make the chutney too smooth – a little coarse consistency will give a better taste
• You can just bake the brinjal in oven too. But make sure to prick some holes all over, to prevent it from bursting inside the oven!


Friday, July 2, 2010

Onion Coconut Chutney

Make a little tweak in the ingredients of chutney, and off you get a totally different variety! Replace one ingredient with another, and you get a new variety. This way you’ll end up not repeating the same variant, and making the variant that most suits the main dish.This chutney is almost like any other coconut chutney that I’ve posted here, but with onions. And taste wise, I bet it’s totally different from all of these....
This tastes best with dosas, (South Indianised) aloo parathas (coming soon).
Onion-Coconut Chutney
Preparation time : 5 min
Cooking time : 5 min
Serves : 4

Ingredients:
Coconut - 1 cup, grated
Onions - 2 small sized, chopped into big chunks
Green chilies - 5-6, depending on taste
Chana dal - 2 tsp
Coriander leaves - 1 Tbsp, chopped
Cooking oil - 1 tsp
Jaggery - a small pinch (optional)
Tamarind - a small marble sized ball
Coriander and Curry leaves - 3-4 sprigs each
Salt - ½ tsp or as per taste
For Tempering:
Cooking oil - 1 tsp
Curry leaves - A few sprigs
Mustard seeds - 1 tsp

Method:
• Roast chana dal, green chilies and chopped onions in a tsp of oil till the mint leaves change color
• Grind the above with all other ingredients, adding a little water if needed
• Transfer the ground chutney to a serving bowl
For tempering / tadka:
• Heat the oil in a pan, add mustard and allow to splutter
• Add curry leaves
• Garnish the chutney with tadka

Tips n Tricks:
• Do not make the chutney too smooth – a little coarse consistency will give a better taste

Variations:
• Use raw onions and you get yet another version!

Friday, May 28, 2010

Beetroot Chutney

Often it so happens that one beetroot will remain unused in the fridge. All its companions would have been used for a palya or so, but somehow this one would be orphaned! And in a house with 5+ people, making palya or so with one beetroot is pointless! So usually this one little thing stays abandoned for days.....
This is one item that can be prepared without much effort and still serves 4-5 with just one beetroot. It tastes great with rice as well as a side dish. And it is way healthier than the full coconut chutney.....
Beetroot Chutney

Preparation time : 5 min
Cooking time : 5 min
Serves : 4-5

Ingredients:
Beetroot - 1, medium sized
Coconut - 1 Tbsp, grated
Green chilies - 5-6, depending on taste
Fried gram dal - 2 tsp
Curry leaves - 2 sprigs
Coriander leaves - 1 Tbsp, chopped
Cooking oil - 2 tsp
Jaggery - a small pinch (optional)
Tamarind - a small marble sized ball
Salt - ½ tsp or as per taste
For Tempering:
Cooking oil - 1 tsp
Curry leaves - A few sprigs
Mustard seeds - 1 tsp
Asafetida - a pinch, powdered

Method:
• Peel and chop beetroot
• Roast green chilies, curry leaves and asafetida in a tsp of oil
• Add chopped beetroot and cook slightly (for 4-5 min)
• Let the beetroot cool slightly
• Grind the above with all other ingredients, adding a little water if needed
• Transfer the ground chutney to a serving bowl
For tempering / tadka:
• Heat the oil in a pan, add mustard and allow to splutter
• Add asafetida and curry leaves
• Garnish the chutney with tadka

Tips n Tricks:
• Do not make the chutney too smooth – a little coarse consistency will give a better taste

Monday, May 10, 2010

Pudina-Coconut Chutney

Chutneys are must-have accompaniments with most of the breakfast items. And there are specific variants of chutneys for specific items. Each slightly different from the other, with a couple of ingredient different form the other, makes a great number of variants. And trust me, the tastes would be so entirely different from one another!
This Pudina-coconut chutney tastes best with Idlis/Mangalore buns. Also goes well with normal urad dal dosas. This time it was specially made for Mangalore buns.
Pudina-Coconut Chutney

Preparation time : 5 min
Cooking time : 5 min
Serves : 4

Ingredients:
Coconut - 1 cup, grated
Mint leaves/Pudina - 1 cup, picked and washed
Green chilies - 5-6, depending on taste
Fried gram dal / hurigadale - 2 tsp
Coriander leaves - 1 Tbsp, chopped
Cooking oil - 1 tsp
Jaggery - a small pinch (optional)
Tamarind - a small marble sized ball
Salt - ½ Tsp or as per taste
For Tempering:
Cooking oil - 1 Tsp
Curry leaves - A few sprigs
Mustard seeds - 1 Tsp
Asafetida - a pinch, powdered

Method:
• Roast green chilies and mint leaves in a tsp of oil till the mint leaves change color
• Grind the above with all other ingredients, adding a little water if needed
• Transfer the ground chutney to a serving bowl
For tempering / tadka:
• Heat the oil in a pan, add mustard and allow to splutter
• Add curry leaves
• Garnish the chutney with tadka

Tips n Tricks:
• Do not make the chutney too smooth – a little coarse consistency will give a better taste

Thursday, January 28, 2010

Avarekalu Kadubu, Coconut Chutney

This is one of my mom’s specialties. I remember dad asking her to prepare this at least once every year in avarekai-season. Yeah, owing to the elaborate procedure, it can mostly be done once or twice a year when we get avarekai. Of course, it’s special taste will remain fresh in memory for a long time!
When Dee had come home once before marriage, mom had made this, and being the foodie that he is, he had fallen for it! Yeah.... fallen more for it, than for me :DAnd after that, mom never made it when we went there, and I too had almost forgotten it, till the last vacation I was there, when she again prepared it, and made us fall!!!
I concentrated on the recipe this time, and tried it out for in-laws after a couple of weeks. And it was undoubtedly a great super hit! And I was proud of myself, as I prepared it all by myself, for 6 people, and the taste was just perfect. The coconut chutney prepared as an accompaniment makes it a great combination. Try it out once for weekend treat for the family.
Don’t miss this wonderful recipe when avarekai is available.
Avarekalu Kadubu


Preparation time : 20 min
Cooking time : 25 min
Serves : 5-6

Ingredients:
Akki tari / Rice rava - 3 cups
Avarekalu / Indian beans - 1 ½ cups
Water - 5 cups
Salt - 1 tsp
Ginger - 1” cube, grated
Coconut - 1 ½ Tbsp, grated or cut into very small pieces
Ghee - ½ Tbsp
Black pepper - 1-2 tsp
Cumin seeds - 2-3 tsp

Method:


• Cook Avarekalu/Indian beans in a pressure cooker with 5 cups of water and ½ tsp of salt for 3 whistles, or till cooked soft
• Meanwhile coarsely crush black pepper and cumin seeds
• Heat ghee in a large skillet, add crushed pepper and cumin seeds and allow to splutter; add grated ginger
• Add rice rava and roast on medium flame for 4-5 minutes or till a mild aroma fills the air. Make sure not to over roast
• Now mix the roasted rava into the pan with cooked avarekalu along with the water used for cooking and remaining salt as per taste.
• Mix thoroughly, ensuring no lumps are formed. Cook for 7-8 minutes till all the water is absorbed and a upma like lump is formed.
• Turn off the heat.
• When the mixture is still hot, take out a big spoon full of the mixture into a plate, wet your palms dipping in fresh cold water in a bowl, and form tight tennis sized balls. Move your palms briskly while pressing the ball and shaping it right, not allowing the palms to take the heat continuously
• Repeat it for the entire mixture, dipping your palms in water each time
• Now arrange these balls in a flat bowl and steam it, like you do for idlis on medium heat for 15 minutes
• Allow to cool slightly, and serve it with a dollop of ghee over it, and coconut chutney

Tips n Tricks:
• The dumpling balls should be made while the mixture is hot. Once it starts cooling, there will be no binding and the dumplings break. So, when cooled, re-heat the mixture with a little more water, and continue
• For kids, make smaller, marble sized balls, so that they’ll like eating one whole marble at one go


Coconut chutney

Preparation time : 5 min
Cooking time : 5 min
Serves : 5-6

Ingredients:
Coconut - 1 cup, grated
Green chilies - 5-6, depending on taste
Chana dal - 2 Tsp
Curry leaves - 2 sprigs
Coriander leaves - 1 Tbsp, chopped
Asafoetida - a big pinch
Cooking oil - 1 tsp
Jaggery - a small pinch (optional)
Tamarind - a small marble sized ball
Salt - ½ Tsp or as per taste

For Tempering:
Cooking oil - 1 Tsp
Curry leaves - A few sprigs
Mustard seeds - 1 Tsp
Asafetida - a pinch, powdered

Method:
• Roast chana dal, green chilies, curry leaves and asafetida in a tsp of oil
• Grind the above with all other ingredients, adding a little water if needed
• Transfer the ground chutney to a serving bowl
For tempering / tadka:
• Heat the oil in a pan, add mustard and allow to splutter
• Add asafetida and curry leaves
• Garnish the chutney with tadka

Tips n Tricks:
• Do not make the chutney too smooth – a little coarse consistency will give a better taste


Friday, September 4, 2009

Pongal & Chutney - A simply great combination


  • Are you tired to cook something complicated, and want to wind off cooking something very easy not compromising on the quality of food?
  • Are you tired after having heavy foods for a couple of days and longing for some simple-food?
  • Are you just recovering from fever, with your taste buds craving for something hot and tasty, but do not want to spoil your health with anything spicy or fatty?
  • Are you just feeling low and want something to lift your spirits up?

If you answer yes to anyone of the above, then here’s the remedy - prepare a bowlful of pongal, and have it hot - real hot with crispy tempering and freshly prepared simple chutney.

Pongal is something that can be made in a variety of ways, with a variety of add on ingredients, and whatever way you make it, it’ll surely taste good. And will definitely make you feel good, lift your spirits up and of course fills up your tummy too. Dont forget to serve with a spoon of ghee poured over the hot pongal!

Here’s a simple version of the simple food - Pongal...

Pongal

Preparation time : 10 min
Cooking time : 15 min
Serves : 4 -5

Ingredients:
Split moon dal - 1 cup
Rice - 1 cup
Ghee - 1 tbsp
Ginger - 1”cube, grated
Cumin seeds - 1 tsp
Coconut - 2 tbsp, grated
Green chilies - 3-4
Coriander leaves - 3-4 strands
Turmeric - 1 pinch
Hing - 1 pinch
Salt to taste
Water - 6-7 cups (or more if you want it more watery)

For tempering:
Ghee - 2 tsp
Black pepper - 1 tsp
Cashewnuts - 2 tsp


Method:
• Wash rice thoroughly and keep aside
• Grind raw cumin seeds, coconut, green chilies, coriander leaves, turmeric and hing into a coarse paste without adding any water
• In a pressure pan, heat ghee
• Add split moon dal and fry till light golden, till it gives out an aroma
• Add the grated ginger, ground mixture and stir for a few seconds
• Add washed rice, water and cook in the pressure pan for 3 whistles

Tempering
• Heat ghee in a pan
• Add black pepper and allow to sputter
• Turn the heat low, add cashew nuts and stir till they turn light golden color
• Add this to the pongal prepared, just before serving, to retain the crispness of pepper

Tips n Tricks:
• Dry grated coconut can be used instead of grinding the fresh coconut with chilies, etc

Variations:
• Add enough water - more than 4 times the quantity of rice and dal combined, to have a watery consistency


And this is the chutney that best goes with pongal...
White Chutney

Preparation time : 5 min
Cooking time : 5 min
Serves : 4 -5

Ingredients:
Coconut - 1 cup, grated
Green chilies - 5-6, depending on taste
Ginger - ½” cube
Asafoetida - a big pinch
Cooking oil - 1 Tsp
Fried gram dal - 2 Tsp
Tamarind - a small marble sized ball
Salt - ½ Tsp or as per taste

For tempering:
Cooking oil - 1 Tsp
Curry leaves - A few strands
Mustard seeds - 1 Tsp

Method:
• Roast green chilies and asafetida in a tsp of oil, till the chilies become crisp
• Grind the above with all other ingredients, adding a little water if needed
• Transfer the ground chutney to a serving bowl
Tempering:
• Heat the oil in a pan, add mustard and allow to splutter
• Add asafetida and curry leaves
Garnish the chutney with tadka

Tips n Tricks:
• Do not make the chutney too smooth – a little coarse consistency will give a better taste

Wednesday, April 15, 2009

Raw Tomato Chutney - Tangy and tongue tingling

FIL: .... I have got a kilo of fresh raw tomatoes.... Will you make that chutney again?
Me : Oh yes, appa, I will
After a week,
MIL : I saw fresh raw-tomatoes on the way. Thought you’d make that chutney again....
Me : Ok! I’ll make it
After another week,
FIL : That chutney was very nice...... first time spicy and second time tangy... But it got over soon... So I bought another kilo of raw tomatoes....
Me : Ya ya... I’ll make it again!

Well, the story goes like this..... Mom had invited our family for dinner and she had made this spicy tangy raw tomato chutney, for akki rotti. Well, my FIL, who craves for spicy stuff, literally fell in love with this chutney. He kept on praising it even after we were home! Though mom was making it before, I, who am not an ardent fan of tomatoes, had never actually realized that it was that tasty!
Then once there were a few green ones lying among the freshly bought heap of tomatoes. And I decided to impress my FIL, by making them. Asked mom for the recipe, and tried it out. I usually make things a little less spicy, as I like it that way. But this time I decided I will not restrict myself to the number of chilies I add! And it did turn out the same way as mom had done, and sure was my FIL impressed with this spicy thing. He even openly praised me for it!! And the rest is history....

We’re getting tomatoes for a very cheap price and every week, there would be a pile of raw green tomatoes, and a request for that chutney! I too make it happily every time, and think I’ve made more quantity this time, so that it will last longer, but well, it just vanishes in a couple of days!

The best thing is that it has a shelf life of about a week..... so comes handy when in hurry..... And since tomatoes are available at throw-away price this season, you can make lots of it!
Raw Tomato Chutney


Preparation time : 10 min
Cooking time : 20 min
Makes : a bowl full of chutney

Ingredients:
Raw tomatoes - 8-10
Coconut - ½ Cup
Green chilies - 10-12, depending on taste
Jaggery - 2 marble sized balls
Salt - 1 tsp, depending on taste
Asafetida - 2 big pinches
Mustard seeds - 1 tsp
Curry leaves - 2 sticks
Cooking Oil - 2 tbsp

Method:
• Chop raw tomatoes into big pieces
• In a pan, add 2 tsp of oil and sauté green chilies, a pinch of asafetida and the chopped tomato pieces for 3-4 minutes, till the raw smell of tomatoes disappear
• Let it cool for 5 min, and then transfer the contents to a mixer jar
• Add coconut, jaggery and salt to it
• Grind the mixture to a medium coarse paste, without adding any water
• In a fresh pan, heat the remaining oil, add mustard seeds and allow to sputter
• Then add remaining powdered asafetida, and curry leaves
• Once the curry leaves are crisp, add the ground chutney
• Sauté well, for 5-10 minutes, stirring frequently, not allowing the chutney to stick to the pan
• Put off the flame once the color of the chutney uniformly darkens
• Let it stand for sometime, till it cools
• Store it in an air-tight jar, in refrigerator and it stays fresh for about a week
• Tastes good with rice and as a side dish for rotti, dosa, etc

Tips n Tricks:
• Use only raw tomatoes, better if sour
• Hing in the mentioned quantity or more adds a special flavor and taste


P.S: Between the time I got this write-up ready and posted, there was one more batch of tomatoes ready in the kitchen, waiting for me to make this chutney! I’ve got bored of making I, but folks at home are still not bored of having it!!

Monday, March 16, 2009

Red Chili-Coconut Chutney

Chutneys can be made in a hundred ways, seriously! A little variation of ingredients, some additions, some replacements, a total set of new ingredients, grind it coarse, grind it smooth, use green chilies, use red chilies....... the options are many. And each preparation gives a totally new variant, a fresher taste. And knowing which chutney goes well with what dish is an important thing too, as the taste of either depends on the other most of the times. A very good dish served with a wrong combination of chutney can make the whole meal bad. Similarly a good chutney that goes well with a dish will definitely enhance the taste of the dish.

Here’s a simple chutney that tastes very good with dosas – especially Neer dose. And it also makes the already superb dosa taste still better!! It tastes very good with rice too.
Red Chili-Coconut chutney

Preparation time : 10 min
Cooking time : 5 min
Serves : 4

Ingredients:
Coconut - 1 cup, grated
Dry red chilies - 5-6, depending on taste
Asafoetida - a big pinch
Cooking oil - 1 Tsp
Fried gram dal - 2 Tsp
Jaggery - a small pinch (optional)
Tamarind - a small marble sized ball
Salt - ½ Tsp or as per taste
For tempering / tadka:
Cooking oil - 1 Tsp
Curry leaves - A few strands
Mustard seeds - 1 Tsp
Asafoetida - a pinch, powdered

Method:
• Roast red chilies and asafetida in a tsp of oil, till the chilies become crisp
• Grind the above with all other ingredients, adding a little water if needed
• Transfer the ground chutney to a serving bowl
For tempering / tadka:
• Heat the oil in a pan, add mustard and allow to splutter
• Add asafetida and curry leaves
• Garnish the chutney with tadka

Tips n Tricks:
• Do not make the chutney too smooth – a little coarse consistency will give a better taste

Variations:
• A small onion can be roasted and ground together with chutney